LEARN WITH FRIENDS OR ON YOUR OWN
Clicks Gone Wild offers two exciting options to learn how to get the most out of your digital camera. We have our popular
Clicks in Your Home Program or One-on-One instruction of our beginner, intermediate and advanced level courses which are taught throughout Arnprior, Renfrew and the surrounding area. More information about us and our courses can be found in the links above. Send us an e-mail at clicksgonewild (at) gmail (dot) com to book your course with Clicks.

Showing posts with label Public Class. Show all posts

Sunday, February 17, 2013

A Sunny Sunday Shutterbug Moment...

While making my morning coffee today, I glanced over at our dining room table to notice the gorgeous morning light streaming in on the small bouquet of flowers sitting there.  It was creating a natural spotlight on the beautiful pink gerbera daisy in the centre.  The light in these types of scenes always stops me in my tracks!! 

I also couldn’t help but think of how so many of the principals of our Step It Up, Shutterbug! course come into play for this one scene – White Balance, Metering Modes, Adjusting Aperture, Colour in Photography and Exposure Compensation.  Immediately I ran over to my desk and grabbed my camera to share the beauty of the moment with you all and let you know that you can learn about all of these topics this week!!  J
With my fancy-dancy dSLR, here’s how my camera interpreted the scene in Automatic Mode (“the green box”):
Automatic Mode
Can I just be honest here, my photo-loving people??  These are not the beautiful flowers I saw in that kiss of sunlight.  L  This is way too dark and this camera (or any camera, for that matter) can do so much better when I take control of a few of the settings and use my equipment to its fullest capabilities. 

So knowing what to do in this scenario, I turned the dial over to one of the semi-manual modes and adjusted a few settings that would account for that brighter area over the daisy and the window in the background, fix the slight bluish colour, and my focal area (because I wanted the attention on the centre of the flower, not the front edge of the petals).

Aperture Priority Mode
Ahh, that's much better exposure-wise.  But I used a small aperture here and you can see so much detail in the background (hello top of the electrical plug); my initial vision was that I was going for something a little more soft.
Yes!  That's it!
All I did was dial in a different aperture setting and voila!! It’s exactly what I was intending to achieve with my camera in this situation.  Creating a blurry background brings the viewer's attention in to the centre of the pretty bloom – what an improvement compared to the first two shots, isn’t it?? 
Okay, I hear you... this may all sound a little tricky to figure out on your own, but it’s not hard to achieve these results yourself with your dSLR.  Active kids, landscapes… you name it, we’ll help you get there with a combination of our illustrative examples and hands-on learning.  As we tell our students all of the time, it just takes a little practice and the desire to take better photographs.
Rhonda and I can’t wait to share this exciting information with the fine shutterbuggin’ folks already enrolled for this Wednesday evening’s class.  And don’t fret – there are still a few seats left!!  E-mail us at clicksgonewild@gmail.com for more information and registration details.
Wishing everyone a Fantastic Family Day Weekend,
~
Gemma 

** If you are ready to take the your dSLR skills to the next level, a comprehensive half-day course on using Manual Mode is set for March.  We cover a lot of the same content as Shutterbug, plus more, and discuss composition and editing. **

Tuesday, October 16, 2012

Stop! Or these mamas will shoot!!

( C'mon, you knew it was only a matter of time before we used that line!)  But I couldn't resist. Check it out:
  

These four wonderful ladies are armed and dangerous after taking our Magic of Manual Mode course on Sunday afternoon.  That's right - these fancy cameras are being used as we speak to their fullest capabilities (and that makes Rhonda and I ecstatic!!).  They can freeze a running child's expression with ease.  They understand how to blur backgrounds with the simple turn of a dial and were rocking it all out during our practice time!! 

We have already seen a few examples of the improvements they've made in their photographs since we taught the course and are so proud!  

You're going down, Auto Mode! 

~Gemma

Wednesday, October 03, 2012

Magic is in the crisp air!

And so is fall.  The colours all across the Valley are so vibrant and inspiring!
If you would love to create some of your own autumn artwork and own a dSLR, we have just the course for you! 

Our most advanced class, The Magic of Manual Mode, is running on Sunday, October 14, beginning at 12:30.  This is is going to be another information-packed afternoon of learning, hands-on instruction and a complete booklet of reference notes to take home. 

If you're tired of producing images that are only worthy of the delete button, then we want to encourage you to use your fancy camera to its fullest potential by learning how to use M on your dial to create your masterpiece.   You will spend five hours with two professional photographers who present it all with visual illustrations in and easy-to-understand manner.  We walk you through the exposure triangle, metering, metering modes, white balance and even talk about photographing in various lighting situations plus share basic editing techniques!

We have a couple of seats left in the October class and won't be offering Magic again in a public format until 2013.  If you are interested, please send us a note by e-mail or message us on our Facebook page. 

The photo magicians are standing by...

Gemma


Tuesday, September 18, 2012

Great Results!

I saw some of Carrie Rayner's images last week and asked her if we could share them here with you. Carrie  took our beginner course and has a passion to practice and learn more about photography. We see so much improvement and skill in Carrie's images! Way to go!

Are you ready to get your photography learning on too?? Our new public Fall course schedule is posted here:  Course Schedule

Advance registration is required for our public courses - so don't hesitate to sign up and start taking photos like Carrie's this fall!!  Please register by sending us an e-mail.


Thursday, June 07, 2012

A look inside Focus on the Features – BEGINNER LEVEL


WHO SHOULD TAKE FOCUS ON THE FEATURES?
Anyone with a digital camera - it's perfect for true beginners, new camera owners or anyone who needs a "photography refresher"

THE COST?
$50 (Public Class or Clicks in Your Home); $75 (Clicks One-on-One)


WHAT KIND OF CAMERA DO I NEED?
Any kind of digital camera - a point and shoot or dSLR

HOW LONG IS THE COURSE?
Just 2 hours in length


Our introductory course to digital photography teaches all of the essentials “beginner tips and tricks” along with more in-depth photography concepts.  It is aimed to get anyone with any level of experience behind the camera understanding how to efficiently and properly operate their digital camera and produce better everyday photographs.  Often many lucky new camera owners are intimidated by all of the buttons on their fancy new camera and we designed this class to help true beginners and more experienced camera users alike. 

We ease into ‘what all of the buttons do’ by giving a brief rundown of universal features on all cameras – from deleting pictures to showing the difference between a compact point-and-shoot camera to a more sophisticated digital  SLR (and what SLR stands for!).  Focus on the Features helps you to venture off of “the green box” by covering: explanations of the standard preset shooting modes, how to achieve great focus, controlling your flash, we introduce the concept of ISO, and end with a section on best lighting situations for a beginner photographer. 


Our main goal of this course is to teach our participants that cameras create some incredible photographs when the user takes control and turns the dial away from Auto Mode.  We give you the confidence to try new shooting modes, tweak a few settings and get you to do much of it it as we go through our presentation.  All of our courses are accompanied by a visual illustration of everything we teach to help the learning process.  We’ve also provided many comparison slides (a photo taken in Auto Mode vs. a photo taken in Landscape Mode, for example) to show you exactly why you should be taking control and playing with your camera.

After this two-hour class you will not only have demystified a lot of the buttons and knobs on your camera, you will be inspired to try out a few new techniques and have some great pictures to show for it!


Monday, April 09, 2012

Capture Your Everyday Moments Confidently

There were big smiles all around yesterday as I sat at my computer with my three-year-old and showed her pictures of this cat.  This is our neighbour's pet, and earlier in the day, my daughter was quite concerned that she was "stuck" in the culvert at the end of our driveway.

All of these images were taken in Manual Mode, which gives the photographer complete control over the exposure triangle.  Manual Mode allows you to take the pictures you envision in different lighting situations, with all sorts of subjects.  And we can teach you how!  Clicks Gone Wild's next course date for the Magic of Manual Mode is Sunday, May 6, from noon to 5 p.m., in Braeside.  To register, send us an e-mail at clicksgonewild@gmail.com .

Learn Manual Mode and feel the same sweet success that my daughter felt when she "rescued" this feline friend.  :)  Your every day is beautiful and meaningful. Capture it with confidence.

Rhonda


Thursday, March 01, 2012

We love our work!! And you will love The Magic of Manual Mode!!

Gemma and I had a 'work day' yesterday, and together we oooohhhhed and aaaawwwwed over some images that Allyne, one of our participants in The Magic of Manual Mode (November 2011) had posted.  We loved her baby picture so much, that we asked permission to share it here with you, as a side-by-side with an image from before the course.  Isn't this fantastic?!  Images like this are a result of education and determination.  Allyne, you have both, and talent to boot.  :)

(NOTE: These were both taken with a dSLR)

Seeing people producing images like this is one of the reasons we love teaching photography!  Parents love getting fantastic pictures of their children as they grow.  (And we've taught a lot of grandparents too, who of course want brag-worthy photos of their beloved grandchildren to share!!)  When we ask participants in our courses to introduce themselves and tell what they like to take pictures of, the answer is often "the people I love."  We couldn't agree with them more!!

The Magic of Manual Mode is our advanced course, teaching how to correctly expose images by taking full control of all of your settings in Manual Mode.  This is the perfect way to learn how to use your digital SLR camera to its full potential!  What is unique about our courses is the relaxed, in-person instruction and the sheer volume of information we cover in an enjoyable and logical way.  You learn by watching comprehensive slides and trying everything you are taught.  We (Rhonda and Gemma) are both there to teach, support, and help you along the way.  The Magic of Manual Mode is a five-hour course, which includes a quick break to eat.  And time flies when you are having fun and learning about something that you are passionate about!  We provide very detailed course notes to take home with you and the opportunity to submit assignments for feedback when you return home and start to put into action your new knowledge and skills.

Today, March 1st, marks the opening of registration for our March session of The Magic of Manual Mode.  This course is being offered on Saturday, March 24th, 2012, starting at 10:30 a.m. at the Arnprior Public Library.  Registration is limited and is on a first come, first serve basis.  The cost of this course is $215.  To register, please send your registration request to clicksgonewild@gmail.com and we will send you an e-mail with details on how to pay to register.  Looking forward to seeing you there!

**Thank you to Allyne for letting us share her work.  We would also like to share her business page.  Check out Kristal Products here:  http://www.kristalproducts.com/

Sunday, February 26, 2012

Hungry for better photos?


Last week was Pancake Tuesday and there’s nothing I love better than a day which dictates what we will eat for one of our meals!  As I stood in my kitchen mixing together the pancakes I was amazed at the similarities between pancakes and photography.  

Yes ma’am (or sir), there are many similarities between fluffy flapjacks and fabulous photography skills!!

Let’s start at the beginning.  Auto Mode – isn’t that just your basic ‘Just Add Water’ box of pancake mix??  Basically all you can control is how much of the mix you’re going to make, the size you make them and how long you cook them for (trying not to burn any, of course!).  With Auto Mode you can only control what it is you’re going to shoot, the orientation (a portrait or landscape presentation) and when you’re going to hit the shutter button.  Sure, you can form some in the shape of hearts or stars, but most turn out boring, roundish-shaped and hopefully, golden brown.  Very few stand out as a work of art.

Just add a squirt of Aunt You-Know-Who and breakfast is served!

Beginner Level
The reality is that we know many of you have a hankering for something more – the out-of-the-box variety satisfies you in the moment, but an hour later you’re back in the kitchen looking for something else to eat.  That’s why we have revamped our program to introduce the new Focus on the Features and Focus on the Frame.  They both give you more control over the ingredients that you’re fueling your body with, and usually yield more appetizing results that you will be talking about for the rest of the day!  “Oh my, Gemma’s pancakes were the best I’ve ever tasted!!!”  (Or something to that effect.)  ;)

These introductory courses give you each and every ingredient so you don't have to settle for the box: basic operational information, illustrations of the presets, composition tips, good lighting techniques and thorough explanations of each adjustable setting.  These tools allow you to confidently make the switch from Auto Mode and play in the presets or understand why and when to tweak some of the semi-manual settings on your digital camera.  We’re giving you all of the essential tools – the whisk, spatula and frying pan – the necessities for a decent pancake breakfast (or lunch, dinner, whatever meal time you choose!).  And we’re right there to tell you on what shelf you’ll find baking powder (more on baking powder later…)! 


Intermediate Level
Our newest addition to the course schedule is Step it Up, Shutterbug!  This is what all of you pancake lovers will want to take if you’ve perfected your concoction of flour, sugar, baking powder, salt, butter, eggs and milk.  You’ll venture out and add a new flavours, perhaps some applesauce and cinnamon, blueberries, or ripened, mashed bananas, if you will.  J  We may even whip up a crepe or waffle along the way!!  You’re also upgrading to an electric griddle so you can cook three or four at a time, not just the one-at-a-time variety in the frying pan on your stove.  (Mmmmm… my tummy is rumbling!) 

Imagine how happy your family will feel when they can sit down at the table and enjoy breakfast with you – the amazing cook??  You won’t be frustrated any longer since you can now provide nutritious flapjacks made from scratch in no time at all.

Advanced Level
Now if you really want to up the ante as you pursue your passion for photography, we have developed The Magic of Manual Mode - for those who won't settle for anything less than the best.  You want to make your pancakes from scratch and cover them in pure maple syrup made from the trees in your own backyard. Living in the Ottawa Valley, we all know it’s a time-honoured tradition that requires patience, perfect timing and work, a lot of hard work.  Yet you can ask anyone - the delectable results can’t be beat.  We even add a heap of fresh raspberries and sprinkle of icing sugar to the top of the stack.  Yum, yum!

Alrighty, here’s my little confession… sometimes (not often) the pancakes on my family's plates came from a box.  It’s usually when we’re camping and I don’t want to lug all of the ingredients and equipment to make perfect pancakes.  And that’s okay.  It's just like when I don’t want to think about the light, composition or my settings on my camera.  At the end of the day, I’m still a photographer and I’m still a decent pancake maker.  J

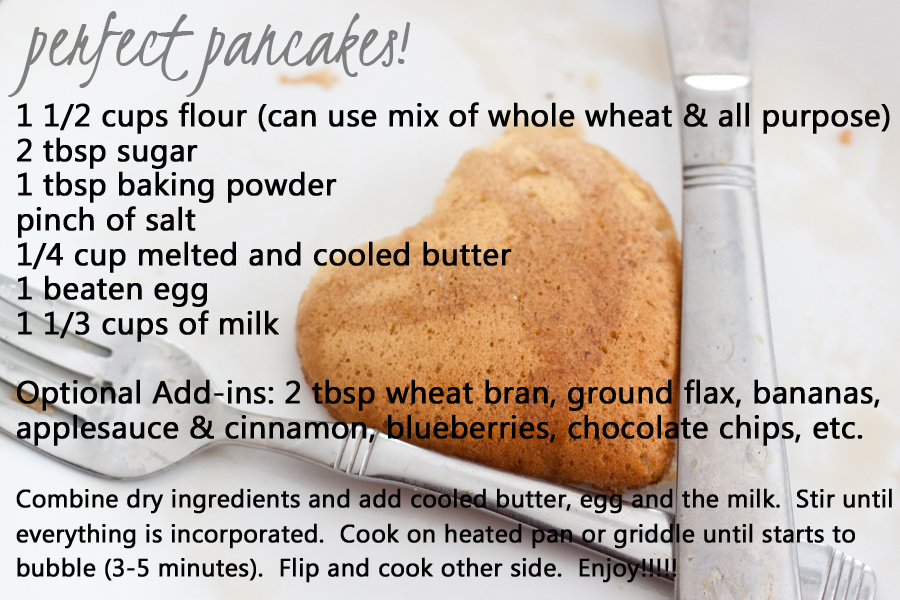
As a special treat, here’s my family’s favourite breakfast:

Want to know another secret?  I’ve perfected my recipe over many years of practice.  Plus, all of the ingredients on their own aren’t nearly as delicious as when they’re all together, stirred with love, and the more you do it the better cook you become!

Truthfully, I don't even look at the recipe any more - I intuitively know how much flour/wheat bran/milk is needed to make the batter just right.  That's because I make them at least once a week (I have some serious pancake connoisseurs in my house!).  Similarly, when the camera is in my hands, I don't have to think about the settings like I did when I was starting out; it all comes naturally to me.  There's one big factor in my recipe to photographic success: I don't leave my camera packed up in the bag and stored in the closet; it's always in a convenient location, loaded with room on the memory card and lots of battery power.  This simple tip makes it a pleasure to pick up the camera, since no time is wasted and I'm more apt to practice when my gear is ready and waiting for me to play.

I recently learned the key ingredient to good pancakes is the baking powder – without that they’re just panpucks, flopjacks.  You'd better load the family and head to the nearest Pancake House, that's for sure.  (I learned that lesson the hard way.)  The baking powder is essentially the educational component in your desire to take better photographs.  You can have all of the other ingredients in the bowl, but if you omit the baking powder you will never get your usual, much sought-after pancakes of yumminess.  

Whether it be through courses or your own self-directed learning, you need to know all of the options and limitations of your camera.  And you can’t be disappointed if you’re leaving the baking powder out and expecting a brunch fit for a king.  Sure, you may get lucky every once in a while and have a few tasty keepers in the batch, but the only way to ensure beautiful results every time is to keep the baking powder handy.  ;)

Isn't it time to feed your desire for capturing moments that you can be proud to share with your family and friends?

We know you can start by bypassing the Just Add Water boxes filled with ingredients you can't pronounce and empty calories, and begin stocking your cart with wholesome ingredients for a change.  (Warning: Once you start, you may come back for seconds!!)  And when you're good and ready, we've got a few Maple trees out back - grab your sap buckets and we'll help you boil it all down to sweet perfection.

Monday, February 06, 2012

Exciting Changes Coming Soon!

Please be advised that as we are entering our second year of Clicks courses, Gemma and I are re-vamping courses and policies.  We know that these new changes will result in improved presentations, more hands-on time during our courses, and ease of booking Clicks In Your Home gatherings.  Please be patient as over the last couple of days our blog has undergone a few tweaks to reflect these changes.

We look forward to seeing you in 2012!
Rhonda

Sunday, January 22, 2012

Who Takes Our Courses, Anyway??

After nearly a year of helping camera owners demystify their digital cameras, we still get a lot of questions and inquiries about our Clicks Gone Wild courses. (And we don't mind, we love talking about photography!!)  Where to begin?  I need a really expensive camera to take awesome photos, right?  What class should I take??

Gemma & Rhonda have taught a wide variety of skill levels in the past 12 months - right from true beginners who need to learn the very basics of the basics on a compact camera, through to people who are ready to control all of the settings on their dSLR in Manual Mode.  All three of our courses will certainly assist you in taking your images to a new creative level!!  So if you're hesitant to join in on the fun for any reason, send us an e-mail and ask for advice on which course would best suit you.

What we know is unique about our courses is the environment created in each of our classes and the camaraderie between us as teachers and the the small group of wonderful people.  Whether it's a public course in a library or a gathering in someone's home, we teach you face-to-face, in real time, and provide picture examples.


You can ask questions.  There are no silly questions.  You can laugh.  You can be inspired.  You are with other photography-loving people at your own skill level. Sit back, relax, meet someone new, learn a lot, keep in touch, and come back for more if you wish.  Let us teach and entertain you.

Together, we share our skills and knowledge and make it just as enjoyable as it is informative for you.

Which course should I take?

Do you just know the very basics of your camera and typically keep your camera dialed in on Auto Mode, a.k.a. "the green box"?  Rest assured that we have taught many people like you. We recommend you check out Mastering the Basics, Part 1 where we cover the basics and so much more.  Learn what all the preset modes are for and what they do to your images.  Also learn about how to focus properly to be guaranteed a few non-blurry photos.  We introduce you to the basics of composition and give ample tips on how to capture better everyday moments.

If you have a firm understanding of the basics and know how to get good focus in your images, you may want to take an intermediate course.  Learn all about proper colour, organizing your picture files, zoom, proper printing, metering modes, and more in Mastering the Basics, Part 2.

Both of our Mastering the Basics series have been designed to use with any camera - the concepts are applicable to a basic point and shoot camera to a dSLR.

Bring it all together in our most advanced course, The Magic of Manual Mode. This course is designed for dSLR owners and includes an extended in-person session and online follow-up private forum for questions and assignments.

And if you're not quite sure where you fit in, send us an e-mail or inquire about our private tutoring sessions.

For a list of courses and what they each cover, see here.

Whatever stage of the game you're at, we look forward to teaching you!


Thursday, January 19, 2012

Happy Almost Anniversary to Clicks Gone Wild!! Enter to Win Gift Certificates!

Happy Almost-Anniversary to us!   On January 29th of last year, Clicks Gone Wild courses were launched with 2 sessions of Mastering the Basics, Part 1.  Since then, we have taught many people how to capture better everyday photos.  And we love it!  Thanks so much for your continued support and for spreading the word so we continue to fill courses and increase people's confidence with their digital cameras!

In true anniversary fashion, the next public course for Mastering the Basics, Part 1 will be held on Sunday, January 29 at 12:30 pm in Braeside.  Please send us an e-mail for registration information.  As always, registering for our courses requires advance payment.  We would love to see you there!

Mastering the Basics, Part 2, which was scheduled for last night, has been re-scheduled due to the snow storm.  We will be teaching Part 2 less than a week from today on Tuesday, January 24.  There are 3 spaces available in this class, so if you have been waiting for Part 2, now is the perfect chance to get in on the action and take control of the colour in your images, metering, file organization, and your prints!

We're celebrating our anniversary over on our Facebook business page and invite you to come celebrate with us and enter to win one of two prizes - a $25 gift certificate and a $50 gift certificate (that's a free Part 1 or 2, or a nice discount for The Magic of Manual Mode).  Here is the link to our Facebook page:   Clicks Gone Wild on FACEBOOK 

There are 3 ways to win, so be sure to take advantage of all possibilities to increase your number of entries into the draws!

1.  "Like" our facebook business page.  (Liking the page is different from liking the status updates, but we love it when you like a whole bunch of things!).  When we reach 200 likes, we will draw for the $25 gift certificate.  :)

2.  Share our status update about the anniversary draws on YOUR facebook page to be entered in the $50 draw.  The deadline to enter this draw is midnight on Jan. 28 and your odds are fantastic!  Thanks to everyone who has shared so far.  Anyone can do this, whether you have gotten around to taking one of our courses or not.

3.  And as a special thank you to those people who have taken classes, if you leave a comment about one of our classes on OUR business page wall, you will earn an additional entry into the $50 draw.  Thank you!

So pop on over to Facebook to enter.  Even if you have taken all of courses and want someone else to win, we would love for you to share the update and your experience with others.  You all are really the reason why we get to keep doing this, as word-of-mouth is our best advertisement.  Thank you!


Hope everyone is enjoying all that snow - and more importantly capturing lots of seasonal photos!!!  :)


Gemma & Rhonda


Saturday, January 07, 2012

Snow can be a photographer's nemesis

But not if you know how and when to properly adjust a few key settings on your camera!  We're here to help you figure out all of the technical mumbo-jumbo, get outside and capture some awesome winter images.  :)

I bet you have taken many, many photos of your kiddies playing in the snow and the person turns out looking darker than they should be and the snow is an icky grey/bluish tone.  Let me show you exactly what I mean... this cutie was having fun playing in the snow with my boys on the weekend and I took this photo of him in Auto Mode on my dSLR:

AUTO
It is nothing like how the scene looked like to me at the time, and what stands out to me the most is that the little boy is underexposed (that's a nerdy photography word for 'dark').

So I flipped the dial over to Manual Mode and adjusted a few settings to get the image I had intended on taking of him in the first place.  I now have a perfect exposure on my subject with white snow, natural skin tones and shows the true vibrant blue colours of his snowsuit.

MANUAL MODE
To get you on your way to taking images like this, Clicks is offering the second installment of The Magic of Manual Mode on Saturday, January 14 for dSLR owners - and it's not too late to join inl!!  We demystify the exposure triangle, teach you to understand light metering modes & white balance, and offer basic editing tips and much more.  If you're serious about mastering your digital camera, this is the class for you!!

If you own a compact point and shoot camera, there is no need to fret.  In our Mastering the Basics, Part 1 (on Monday, January 16) we teach you to confidently take your camera off of Auto Mode, put it in Program Mode and never look back. And with the concepts we teach in Mastering the Basics, Part 2 (on Tuesday, January 17) we take using Program Mode to the next level and really tap into all of the image options.  Here's a similar situation to the above photos, but I used my handy point and shoot camera instead, along with some of the tricks we teach in Part 2:

AUTO
Again, the snow is greyish, and his adorable little face doesn't jump out at you like it should.  In fact, Auto has done a terrible job at focusing properly on my pint-sized subject.  But I have Program Mode ready and waiting for me to use, and tweak a few of the adjustable options. 

PROGRAM MODE
Much better - his face is much crisper, the colours look truer to life and I have white snow!!!  And the best part is that I have unleashed the power of my little digital camera!

We discuss how to get snow looking white (as it should be) with some of the tips we teach in Mastering the Basics, Part 2.  Click on the links at the top of the page for more information about each of our classes.  To sign up, or be the first to be notified when we announce new class dates, send us an e-mail to clicksgonewild (at) gmail (dot) com ... or click here.

edited to add: This information is now in our new Intermediate-Level course, Step it Up, Shutterbug!  ;)

Happy Winter, Everyone!!
Gemma
(Thanks to my little buddies for helping me out taking these example shots!!  Big hugs from Auntie Gemma.)  :)

Tuesday, December 06, 2011

Capturing Those Tiny Toes

A few months ago, before the birth of her first little one, Melissa attended Mastering the Basics, Parts 1 and 2 courses back-to-back at the Arnprior Library.  Armed with her Nikon and a good eye, Melissa picked up some photography tips during our few hours together and used her new knowledge to do some additional self-directed learning.  We were so happy when she sent us these beautiful captures of her new addition.  Isn't she precious?!  We have a feeling this will be one well-photographed infant.  :)  Thanks for joining us, Melissa, and especially for letting us share!

Mastering the Basics, Parts 1 and 2 are both full of great instruction for any point-and-shoot or dSLR owner.  Even if you have never taken your camera off the green box (auto mode), Gemma and I will help you make sense of your camera.  You will learn how to take full advantage of your camera's features (take control!) and to get better everyday photos!

There is a Mastering the Basics: Part 1 tonight (Tuesday, Dec. 6) in Braeside, with a few spaces still available.  Email us at clicksgonewild@gmail.com to register.


Rhonda
 

Sunday, November 06, 2011

It's Going To Be a MAGICAL Week!!!

Gemma and I are on the countdown to this coming Saturday, when we launch our newest and most in-depth photography course, The Magic of Manual Mode.  WOO HOO!!!!  We have been writing, compiling, reviewing, and planning with great gusto to make this a truly fun, enlightening, and comprehensive course on the exposure triangle and shooting in Manual Mode.  And the best part is that we have a great group of keen people on board for this course - which makes our job super fun.  Great people + great info = fantastic photography.

The cost of the Magic of Manual Mode is $215.  We have a teensy little space left if you want to register and join us.  This course includes an extended in-person class with us this Saturday, Nov. 12 starting at 10 a.m. (in Braeside) and then continues for the three weeks following by e-mail and online forum.  We also are giving class notes for reference so you can spend as much time possible soaking up the inspiration and playing with your camera during the class!!  Students will have the opportunity to benefit from the optional follow-up assignments to solidify your learning and will continue to learn through personalized feedback.  As well, you'll be able to ask us any and all of the questions that will surely come up when you go home and put into practice the TON of information that will be presented this Saturday.

I'm so excited to share this experience with those of you already registered.  :)  We're really going to put those cameras to work!!  Shooting in Manual will forever change how you take and see images.

To register for this course, for more information, or to be added to our mailing list to hear about upcoming learning opportunities, e-mail us at clicksgonewild@gmail.com.

Here is a photo I recently took in Manual Mode.  You can learn how to do this too!


Rhonda

Wednesday, October 05, 2011

The mighty Point & Shoot camera

The kids are all settled in the back-to-school routine and now it is time for all of you photography lovers to make time to learn what all of those little buttons and gadgets on your digital camera can do! Both Rhonda and I hear all of the time from people who want to learn how to properly use their camera, but don't have the time. They put off reading their manual and those special moments that they want to capture on their own are forever recorded as blurry, poorly composed snapshots.  If this is you - you are not alone!

I learned long ago that it didn't take a fancy expensive camera to take decent photos.  Photography is something I've been passionate about my whole life and I was determined to understand how and why my camera worked the way it did. Bottom line, I never wanted to settle for out-of-focus memories and images that didn't look as the scene appeared to me at the time.

A whole new world opened to me once I could adjust settings and tweak my camera to get the desired image on the back of that tiny LCD screen (remember when they weren't much bigger than a postage stamp??). The best part was I didn't need to spend a fortune in equipment because my little trusty point and shoot camera was doing the job for me!

Thought I'd share a few images taken with my very first digital camera (a Canon A60 - nothing fancy!) to show you exactly what I'm talking about.  These were captured long before I splurged on a dSLR:

Sharp shot of two babies!!
(Nov. 2004)


My son isn't blurry even though this was taken indoors with no flash.
(March 2005)


Love the look of sharp focused details, like flowers set against an out-of-focus background? So do I!! Macro photography is fun and really easy with any kind of camera!
(August 2004)


Capture all foreground and background details to create compelling landscapes!!
(May 2005)


Most of the information I learned from my early encounters with a digital camera is packed into our class Mastering the Basics, Part 1. And trust me, these simple tips and tricks can go a long way.  Rock the camera that you own now!  We teach you that most of the functions and menu choices are available as standard options on any camera, no matter the price you paid for it.

Invest in the education first, is my philosophy, before making another camera purchase.  You will be surprised to find out what that little camera of yours can do! Sign up for our introductory course and let us be your talking manual for a couple of hours.  You'll be entertained and educated.  We'll open your eyes to the components of a great photo and walk you through what you need to know to do it all on your own.

For more information, you can check out our Course Schedule link above, or contact us.

-Gemma

Monday, October 03, 2011

MASTERING THE BASICS | White Balance

We just received an upbeat e-mail today that read, "I just did a custom white balance off a feed sack in a barn!  And it worked!"  We share this enthusiasm and it makes our day to know that tips and tricks that people learn in our classes are working for them to get better everyday photos!

White balance, as well as posing, metering options, printing, and more  is covered in Mastering the Basics, Part 2:  Get Organized, Proper Colours, and Print.  This course is being offered on Saturday, Oct. 22 in Arnprior.  You can have any digital camera (a point and shoot or dSLR) to participate in this class. Pre-registration is required.  Contact us to register.

edited to add: White balance is now covered in Step it Up, Shutterbug!  ;)

Friday, September 23, 2011

Get really wild in Manual Mode!

Entry-level dSLR cameras are becoming more affordable and are quickly becoming the camera of choice when presented as an option in comparison to a quality point and shoot.  There is no doubt about it....when I bought an SLR and started capturing images, right away I noticed a difference in the clarity and colour of my images in comparison to my much-cheaper point and shoot.  And I was shooting on auto mode!

But looking back, I really had no idea how truly powerful my digital camera was, and that these images could really be better in so many ways.  It wasn't until I learned how to shoot in Manual Mode, controlling my shutter speed, aperture, and ISO for every shot, as well as choosing an appropriate metering mode and white balance, that I understood what can happen when you learn to use your camera to its full potential.  In fact, I could plainly see what happens - right there on the LCD on the back of my camera and later on when I downloaded my card to my computer!  Needless to say, there was such a difference that there was no going back.

As an illustration, here are some pictures taken in automatic mode with an SLR, as compared to the same image taken with the same camera in Manual mode.  Notice the flashy auto pictures in comparison to the properly-exposed manual pictures.  See the ability you have to choose where to focus in M.  All images are straight out of the camera, with no edits......


Here I want to blur the foreground and focus on the words on the label...

Obviously, it's easier to achieve this effect when I control everything in Manual, compared to the Auto snapshot.  And it's appropriate that I'm choosing to show you the difference between auto and manual through images of food taken on my kitchen table.  When I bought an dSLR, Gemma used strawberries in a bowl on our friend's kitchen table to show me the power of manual mode.   :)  It wasn't long after that when I said "so long" to Automatic mode and was taking the types of photos I had always envisioned in my mind, and all in Manual Mode. 

Mastering the Basics, Part 1:  Camera Features and Composition and Mastering the Basics, Part 2:  Get Organized, Proper Colours and Print (more of an intermediate course, really!) are fantastic introductions to the world beyond automatic mode, as well as the artistry of photography.  Time and time again, people are telling us that the tips offered in these courses help them take better everyday pictures with the digital camera that they have (dSLR or P+S).

When you have grown beyond the basics, whether on your own or through our courses, The Magic of Manual Mode is for you.  Our brand new extensive course, which includes in-depth instruction, examples, hands-on practice, follow-up help, support and encouragement through assignments and feedback, is launching this November!  Participants are already signing up and I can tell you that Gemma and I are so excited to teach this course and open up a whole new world of possibilities to other photography-loving people!   And here's even more great news - we're covering basic editing techniques as well!

Can't wait!!!!
-Rhonda

Tuesday, August 23, 2011

TESTIMONIAL | Jaime

We love to hear how our classes result in better everyday images for our students!!  It makes us SO happy!  So we're pleased to share this testimonial from Jaime and some of the beautiful pictures she has captured since taking Mastering the Basics, Parts 1 and 2 with Clicks.  Thank you, Jaime!


With a love of photography, and knowledge that the shots taken with my older point-and-shoot camera were “decent”, I knew that there was room for improvement.  Equipped with a brand new Nikon DSLR, and only weeks before a trip to The Golden State of California, there were memories that would need to be captured.  I wasn’t naïve in thinking that my new camera was going to be what did it for me, and so I was looking for someone’s help in giving me an insight into the world of photography.  At the most appropriate time, I stumbled upon the “Clicks Gone Wild”, Mastering the Basics workshops.  With a tight timeframe before my trip, I did both Part 1 and Part 2 on the same day!  These workshops were amazing.  More importantly, Rhonda and Gemma were wonderful.  Their up-beat personalities, professionalism and talent, combined with the jam-packed information that they provided in these two sessions were remarkable. That afternoon, I walked out the door knowing that I was equipped with the information needed to turn my “decent” shots, into “memorable” ones.  Thanks to Rhonda and Gemma, I continue to learn every day, through every shot.  Thank You, Ladies!
Jaime Christie-Stewart
Participant in Mastering the Basics – Part 1 and 2 – April, 2011

Monday, March 07, 2011

Re-vamped Mastering the Basics

Hello shutterbugs!

Welcome to this latest adventure for us.  We had a 'test run' of our Mastering the Basics, Part 1 course in late January and the response was incredible!  We have been busy over the last month fine-tuning and are ready to launch our two-hour sessions filled with photo illustrations and tons of tricks of the trade.